“Grooming Your Golden”
by Morningsage Goldens
Photos and Text – Joanne Lastoka Jan. 18, 2001
GRCA would like to thank Joanne Lastoka for donation of these pages on Golden Retriever grooming.
The tutorial for grooming the ears, tail and shoulders and one for grooming feet are all on this page. You can also view the Blow Drying Q&A here!
GROOMING TUTORIAL – EARS
TOOLS:
Medium/fine tooth steel comb
Slicker brush (wire pins)
Good quality straight scissors (7 1/2″ size is good)
Blunt nosed small scissors (for whiskers if you wish to trim)
High quality thinning shears 46-tooth/serrated on one blade only (I would recommend Millers Forge – Gold 7 1/2″ as above) but NOT the “economy” MF or any other brand. Expect to pay $45+)
Toenail clippers, and or a Dremel tool for grinding nails or Oster Nail Grinder
Grooming table or rubberized matting on an old table
Cool drying blow dryer (would be an excellent investment)
PREPARATION
Start with a clean and dry dog, if not already bathed, thoroughly brushed. Actually for show grooming, I prefer trimming the dog before bathing, then doing any touch-up work after the bath and blow drying. If you wonder how those show dogs get those nice straight coats….it is from the blow drying. If you cannot afford a blow dryer, it is considerably more difficult to straighten a wavy coat, but it can be done by pinning towels snugly around the dog while they are still dampish. The blow dryer also comes in really handy during wet weather, after trips to the beach and yes, even “blowing” away all of that coat when the dog is shedding!
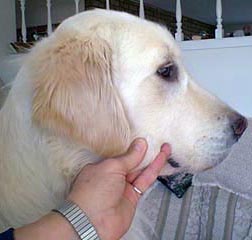
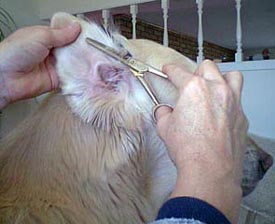
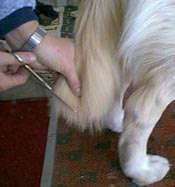
This is a relatively ungroomed ear. See the fine fuzzy stuff on the top (or base of the ear), as well as the long straggly fluff behind the ear.
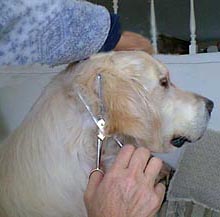
Start with the fuzzies behind the ear. Hold your thinning shears vertically as shown, and get the blades under the fuzzy stuff fairly close to the skin. Make about 3 cuts with the blades, then stop, brush out and look. You will probably need to repeat this several times, but note, we don’t want to totally remove the hair, we just want to thin it, & trim the straggly stuff so it will lay down nicely on the neck. Normally, I would be holding the dogs ear forward & out of the way while doing this.
Trim with thinning shears from the starting point shown, toward the face. On most dogs, not much is needed here. You do not want to trim the inside of the ear flap totally smooth and short or you will create a very “hard look” for your dog. The exception would be on a dog with extremely heavily coated ears (inside & out), which usually means heavier or thicker ear leather as well. In that case you may wish to thin quite well on the inside of the ear flap.
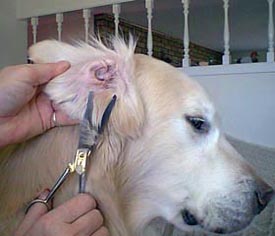
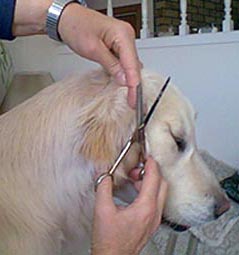
Next trim the hair in front of the base of the ear; using the same method with the thinning shears; thin, brush, look, repeat. The hair immediately around the ear opening should be trimmed close, or plucked with forceps, taking care not to have bits of hair fall inside the ear canal. The hair under the fulcrum of the scissors in this picture, actually on the dogs neck, should also be thinned in this way from about 2″ below the ear, up to the base of the ear.
Unless you have a dog with very heavily coated ears inside, you will only need to make one “light” stroke with the thinning shears here, at most one stroke this direction, and one stroke close to the skin under the coat going the opposite direction (towards the dogs nose).
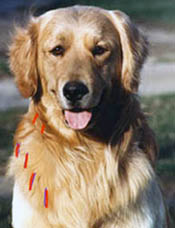
Notice, by looking at your dogs ear, that the hair naturally grows longer at the top, and shorter towards the tip. When trimming the hair, we want to neaten and shorten, but in essence keep the “natural effect”. Take too much off, and again you will change the “soft” facial expression of your Golden, to a very unbecoming “hard” look. Notice the angle that the thinning shears are being held in relation to the long hair on top of the ear held between my fingers. The thinning shears are held so the cut will be shorter at the tip of the ear (lower hand), and longer at the top of ear ( the actual base of ear).
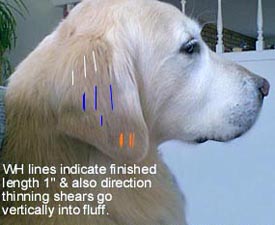
Blue Lines: length is tapered with less length 5/8″ down to 1/2″ or less and usually the orange line area wouldn’t be trimmed at all.
See the white, blue and orange markers, directing the approximate lengths that the hair on the front of the ear is trimmed. As a beginner, do this trimming in small increments over a period of several days, in which time you have the opportunity to look at your progress, without having “butchered” the dog. First use the thinning shears underneath the longer hair on the top 3rd of the ear, close to the skin, and make a couple of strokes with the thinning shears vertically across the width of the ear, and comb.Secondly: trim the length of the hair on the ear with the thinning shears as in the picture above, but do so only about 1/4″ (or less) at a time; comb out, look and then do a little more. This is the most critical part of grooming the ear, so work slowly, stop and look at it for a day, then do a little more if necessary.
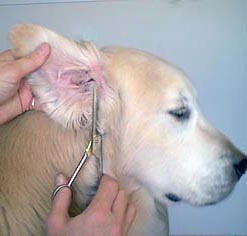
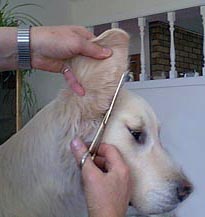
Trim the outside edge of the ear with quick repetitive cuts with the thinning shears, all around the ear, from the position shown, around the tip and up to about my thumb on top hand in photo, and don’t go any farther up the inside front of the ear. Holding the ear out and away from dogs head do the same with the hair from the fulcrum of the shears (left in this photo) and just above the thumb of hand holding shears. Voila’, you have successfully neatened the shape of the ear.
Here we have a good example of a “neatened”, natural looking ear. Note:The few long curls that run the length of the front rim of the ear, take very little thinning and trimming. If you cut this short, again you will spoil the soft expression of your dogs face. This specific problem is not shown in picture form: I use the thinning shears close to the skin, going vertically up under these hairs, and trim ONE stroke or thinning cut only. Comb or brush it out, and don’t be surprised that you didn’t take much out…that is what we want! Then brush or comb these “decorative face framing hairs” straight out from the ear, and angle your thinning shears so you trim closer (shorter) at the tip of the ear and yet leave these hairs longer at the top or base of the ear by the eye, just as it grows naturally. Truly, I do very little here, for the reason I’ve said, and these decorative hairs will lay down and look neat with very little trouble. WHISKERS: Goldens may be shown “with” whiskers, and of course their whiskers are of great importance in hunting and other performance activities, so it is entirely up to you whether you wish to trim them, or leave them on. Or, you may do a combination of trimming only the crooked or heavy whiskers, and leaving the finer ones. If I were not showing the dog, I definitely would not trim them. If you choose to trim whiskers, I prefer to do so with a small blunt nosed scissors. Facing the dog, holding the muzzle with one hand, and using one finger to pull the flews slightly towards you will make the whiskers stand straight out. The dog cannot “hide them” with this method! Then you use your blunt nosed scissors, very close to the skin and being very careful to go under the short hair of the face, trim the whiskers from the back toward the front, each individually. Really good lighting, or daylight is needed to see what you are doing. The very fine whiskers around the nose, and under the chin are also trimmed, but these may be trimmed carefully with your regular straight shears if your dog is steady, otherwise continue to use your blunt end scissors. These whiskers can be trimmed straight across and even with the coat (without doing individually). Trim the whiskers along the lip line as well as by the throat, eyebrows, and on the cheek near the ear.

GROOMING TUTORIAL – FEET
TOOLS:
Straight shears
Thinning shears
PREPARATION:
Trim the nails first!
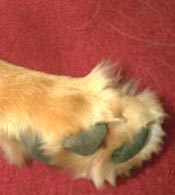 Here is a photo of a fuzzy, untrimmed front foot, about 3 weeks’ growth. Here is a photo of a fuzzy, untrimmed front foot, about 3 weeks’ growth. |
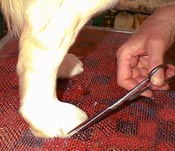
| The fuzz growing from between toes, circled here in this photo should be pushed down through the dog’s toes with your finger. |
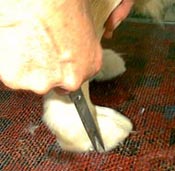
| The foot should be held backwards. (whether using a grooming table, or grooming on the floor), and the straight edge sheers are then laid flat (parallel) to the pads of the dogs foot and all of the unruly hair trimmed even with the bottom of the pads, including the fuzz you just pushed through from the top of the foot (Fig 1a) Do NOT trim the hair from between the pads either from the top, or the bottom of the foot! If you make that mistake, you will have a splayed and flattened foot; ugly to look at, and not in keeping with the Breed Standard, that says “tight and cat-like”, and certainly not ready for the show ring! |
| Next, use the straight shears around the outside perimeter of each pad, working for the most part, with the foot held backwards and working from underneath. This is an additional view to the left, just to show how you are skirting the edge of the pads on the outside of the foot. |
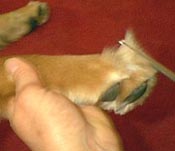
| Now… back to the fuzz on top of the foot. I had you push it down through the toes and then trim it flat and even with the pads on the bottom of the foot. NOW I want you to pull it back to the top of the foot with your fingers so it is straight out as in the photo to the left. Then with the thinning shears make one thinning cut, making sure you are making your thinning cut only in the fuzz. Then STOP. Brush the hair down with a bristle brush, or push down with your fingers. Look at your progress with the dog standing on the grooming table. You may also pluck a small amount of this fuzzy hair out with your fingers, but remember don’t remove a lot of it! Not done yet, but we will come back for finishing! |
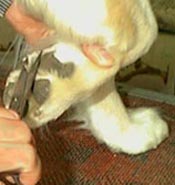
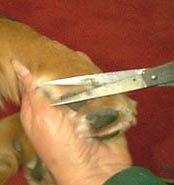
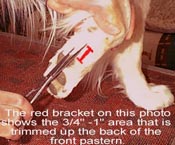
| In this photo, I am showing the angle of the straight shears held perpendicular to (and actually laying on) the large pad on the front foot. I am holding the toes with my thumb and forefingers, to enable laying the shears on the large pad. The pasterns are usually only trimmed up from the pad about 3/4″ to 1″ max for show purposes, so as not to give the dog a weakened look to his pastern. You do not do this trimming closely, either with scissors or with an electric clipper, this is why you are trimming even with the level of the large pad. In my opinion an electric clipper has no place in the Golden Retrievers grooming tool box. |
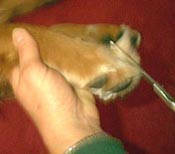
| Here again, with straight shears: showing the trimming of the front pastern. I prefer using the 3/4″ trim only, and of course you are trimming across the width of the foot while doing this. |
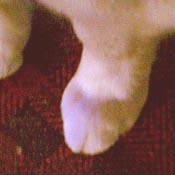
| This photo is showing the perpendicular final trim on the fuzz over the toenails of both the front & back feet. You may use either the straight blade shear, or the thinning shears for this, but I suggest the thinning shears until you are well practiced. Do not lay the shears in toward the foot when doing this, keep them coming straight up from the table. This must be done with the dog standing. The thinning shears may be used with rapid-consecutive cuts (held perpendicular to table) as shown above, around the general shape of the toes (outside edge of front & rear feet). |
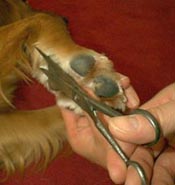
| This is the final trim around the feet, front & back, with the dog standing on the table. The tip and bottom blade of your straight shears should be resting on the table. When trimming around the nails, depending on the type of foot the dog has, I may decide to trim more away from the toenails, to shorten the appearance of the toes, but in most cases, you do not want to expose the toenails, and should not need to, especially on the back feet. Just slide the shear along the nail to trim as shown. |
| If at this final look at the foot, you are still not satisfied because you still have “fuzz” on top of the toes, pull the fuzzy hairs out away from the foot once again, and at the outside edge of the fuzz, angle your thinning shears so they will make the cut closer (or shorter) near the toenail, and longer near the top of the toe as shown in this photo. Thin one stroke or cut at a time, brush the foot and look, with the dog standing on it; this should take no more than 1 very light thinning cut, possibly two. |
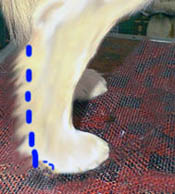
| Trimming the hock is simple. Brush the hair out from the foot and hock. Using your straight edge shears, make a vertical cut, perpendicular to the table the total length of the hock, leaving the hair length at least 3/4″ to 1″ long at the back of the hock as an end result. If the dog has an excess of hair, you may thin it a little with thinning shears. The dotted blue lines in the photo give you an idea of where to trim, then brush down, and neaten up at the back of the pad. You are neatening up the “line”, but you do not want to trim too short…note the actual hock is a good distance away from my dotted line! |
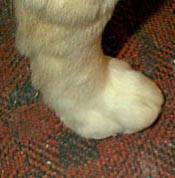
Photos of the “finished foot” both front (left) and rear (right) is shown here:
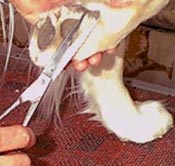
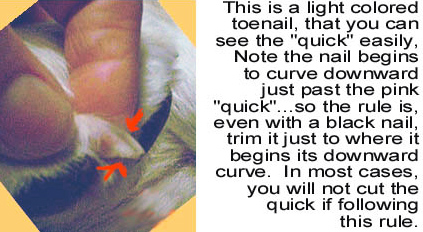
Nail trimming, is easily done with a good quality Large Dog nail clipper, which I prefer over the guillotine type clippers. Have some Quick Stop powder or other styptic powder for stopping bleeding if you do accidentally cut too short. If you don’t have that, some cornstarch or baking soda will also work, just pack it into the nail, and keep the dog quiet and out of water for a few minutes. With the this photo as a guide, you are unlikely to have an accident happen, if you trim a little at a time, and don’t have a dog that is jerking and trying to pull away. Do NOT yell at your dogs or whack on them during your grooming sessions! Keep the sessions short, talk calmly and authoritatively to them, insisting that they hold and “S T A Y- Y” while you work on them, the give them lots of praise!
On some very overgrown nails, you might also double check the length of the quick by looking under the nails. If the nails are extremely over-grown, you may have to trim a little at a time and often to get them shortened. A nail grinder is also wonderful tool, and often I find that dogs that are frightened, and fight having their nails trimmed with a regular hand trimmer, are perfectly fine with the electric grinder!
The red arrows on the photo show where you should make your final trim. Note: if you are using grinders, do not grind for more than a couple of seconds at a time on one nail, as the heat from grinder friction on the nail can also be painful. Do a little at a time on all nails and take special care not to catch the grinder in feathering or other hair!
Do not forget to trim the Dew Claw, which sits higher on the inside of the front leg. If this is not trimmed, it can literally turn and grow back into the dogs foot and cause real problems.
 |
GROOMING TUTORIAL – TAIL/SHOULDER
TOOLS:
Thinning shears
PREPARATION:
Brush the tail thoroughly, making sure all traces of tangles or matts are removed.
|
Don’t let this task daunt you, it isn’t that hard, just do a little at a time, over a period of several days, until you have the effect you desire. The Breed Standard reads that the tail should just reach the dogs hocks, and though some dogs will have a slightly longer tail, your goal is to trim the tail to that length as closely as possible, and still not have the tail look noticeably sculptured. The Goldens’ tail has a rounder, fuller look when groomed, and the triangular wedge seen on an Irish Setter with a “break” at the base of the tail, is NOT the look desired. The area at the base of the tail is customarily not groomed to separate the tail from the feathering on the butt, as is done with the Setters in particular for the show ring, although on a heavily feathered dog, some shortening of the length can be done to keep the dog cleaner. |
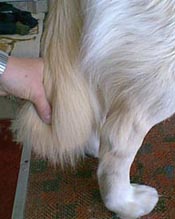
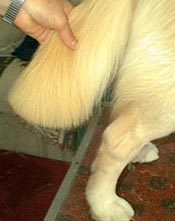
| Hold the tail down to the hock and place your thumb at the point where the end of the tail meets the hock to mark the length you will trim the tail to match. Note: in the photo, an imaginary line drawn from my thumb will just meet the top of the dogs hock. This will be the final length of the tail. |
| Using the thinning shears, start trimming just past that point, giving yourself some leeway, especially if you are a beginner. |
| On the majority of dogs, especially if having never had their tails trimmed before, you will have quite a ragged edge of sometimes quite lengthy feathering, often much longer at the tip, and also very long at the point in this photo that my thinning shear is just beginning to come to. I make the initial cut of length this way, then come back, moving side to side across the tail breadth, making light and fleeting cuts to blend up the sides of the tail, so blunt cuts are not glaring at you. More extreme length of the feathering at the tails’ base, should be trimmed a little also, this particular dog does not have an abundance of tail feathering or coat at this time. |
| Lift the tail and begin thinning, rounding the length of the tail feathering slightly as you go toward the base. The dog in the illustration had his tail trimmed not that many weeks prior to the photo, so you need to look closely to see that I am trimming about 1″ of feathering off. |
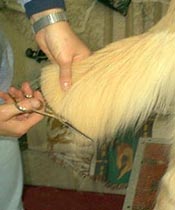
| The thinning shears are also used, inserting the blade underneath the coat and “into” or “with” the direction of coat growth as in the red lines shown on the photo. A small amount of trimming is done under the ear on the neck area and under the dogs chin where the two red lines are above. |
Following the line of the shoulder, if a heavy “shelf” exists as shown above, careful thinning of undercoat in the direction shown by the arrows, and combing out, will blend the coat in and reduce the heavy or “over-loaded” look to shoulders and neck. Groom over a period of several days and “Stop, look, assess” as we did when doing the ears.
On some dogs, similar thinning at the base of neck at the withers is also necessary. Note: topcoat is NOT removed in any of these area’s, we are just thinning undercoat to remove some bulk. Over zealous grooming in these areas, whether done with thinning shears, or a stripping knife will not preserve the natural look of the dog, nor will it enhance the dog or cover up lesser qualities. The dog should not have an “hourglass” look when looking straight at the front when done grooming.
GROOMING TUTORIAL – Blow Drying: Questions and Answers with Joanne Lastoka
Mike’s Question:
Ok Joanne, what’s the proper method of drying a dog from the skin out? My guys are doing lots of swimming this week, its hot, humid, and now starting to rain again. I don’t want hot spots, but do want to exercise my dogs in the water. Last time I dried a dog I did it wrong and had feather mats big time.
Answer:
It is hard work Mike, even with a good cool forced air dog dryer or livestock dryer, that’s why most groomers, both at vet clinics and in private businesses don’t dry the dogs totally. They stop at damp dry and crate him/her to “air” dry before sending the dog home. Drying the dog
completely is really important, both to prevent the dog from getting “hot spots” (acute moist dermatitis), and in case of a show dog, you don’t want the dog laying on damp coat & pressing his coat into the waffle design of a crate, or creating unsightly cowlicks here and there!
Often if the owner feels beneath the hair, close to the skin the dog will still be damp. I’ll describe drying the dog in stages. Dogs that have never been dried with a forced air dryer before should be allowed to get used to the sound & “feel” of the drying SLOWLY and with great care and patience by the owner/handler. See “Puppies” below, instructions can be modified for older dogs as well! Your lap is the best place to dry a very young puppy, and a grooming table with arm is the choice for a dog of 3 to 4 months of age and up.
PUPPIES: When working with young puppies, I do recommend getting them accustomed to being dried with a human blow dryer on the low/cool setting by bathing and drying them every few weeks from the time they are about 7 weeks old. I begin with the puppy sitting in my lap, and then start the dryer holding it a bit of a distance away from them, until they get “used” to the sound of it. Move the dryer around, as it makes different noise with the motion needed to dry the pup. Towel dry the puppy as well as possible. Then with puppy still held securely in your lap, and with lots of calm voice encouragement, begin drying the puppy starting with the rear end. To do their tummy, hold the puppy with his back to your chest, while he is sitting in your lap, and blow the warm air on his tummy as you continue to talk to him! Rub and massage the puppy with your fingers gently as you blow him dry. Be sure you are not using a heat setting that is too hot for puppys’ gentle skin, it should be the low/warm or cool setting only!!!! Also, please read the NOTE below about working around face/head & ears.
Working with an older puppy or Adult:
Drying Instructions for BodyCoat
NOTE: when working around the face & ears, you need to work carefully using the diffused nozzle or removing the nozzle completely, and avoid blowing directly in ears or eyes. I usually hold the ear flap tightly to the head with my free hand, and cover the eyes with my hand as well. Human hair dryers can be used for the head area in particular, but remember, they get quite hot, even on the “warm or cool” setting. I don’t recommend using a human hair dryer for that reason; most dogs just can’t stand putting up with the heat or the extended amount of time necessary to actually get then dry.
My personal method of choice for blow drying a dog with a forced air dryer, is to begin with the dog quite WET, having done very minimal towel drying. I then begin with a once over, using the concentrated or full force air nozzle, first doing the rump (croup) and tail area (important…see “Feathering” below), then jumping to the head, neck, body to remove most of the really saturated water from the coat. I’ve not yet done any feathering.
Next you begin again but this time at the dogs top skull.
**Now it is important to blow the water away from the skin by blowing against the growth of the hair, with the concentrated air flow nozzle, using small circular motions. Move slowly, working from one end of the dog to the other. Once you’ve accomplished getting the greatest share of the water off the dog by doing this, and following the instructions below for drying the dogs’ Feathering, you will go back & do it again but you will switch to the wide (diffused) nozzle or no nozzle on the dryer and using your free hand, rub constantly as you continue to blow. If you use your fingers (my choice instead of brush), the dog gets a wonderful massage, and you WILL feel when it is totally dry. It truly is not necessary to worry about brushing the dogs’ top coat flat during this process. Brush between your first and second “round” of blow drying so that the opposite end of the dog that you are working on stays flat, and brush again when finished.
Feathering:
When you are working with the dogs feathering, you do NOT want to be working in a circular motion with either of the nozzles , or you will succeed in tying the feathering into lovely knots (mats) in a matter of seconds! This includes the dogs “bib or mane”, front, rear and belly feathering. For feathering, I use the largest most diffused nozzle or no nozzle at all.
I begin by holding the longest hair out of the way with my free hand, and drying in sections carefully using steady blowing and no circular motions, using the slow speed if you have a multi-speed dryer. Specifically for the rear legs: hold a handful of the long feathering up with your free hand, and dry the portion closest to the hock first, then let a bit more feathering down, and again dry by blowing straight down onto it. I continue working from the lowest feathering on the leg, toward the top near the tail. I am still blowing from the skin out, and frequently brushing as I go. Same thing for the dogs underside and bib, use the diffused nozzle and blow straight and carefully, and brush often.
The Tail:
The tail should be brushed/combed carefully before you start attempting to blow it dry. During the initial “shooting off” the excess water, you should be holding the dogs tail straight down toward the table or floor, and blowing the top of the tail only andblowing in the direction of the growth of the hair which is from the tail set toward the tip of the tail. Later, when you have come back to work on this area again, use the diffused nozzle, or no nozzle and dry both the top and bottom of the tail from the skin out, carefully, with thestraight blowing technique NOT circular motion.
Pay special attention to getting the croup (rump) and tail set area, both above the tail, around and underneath the tail set and well down the thickest part of the tail, very well dried to avoid getting a “cold” in the dogs tail. I personally do two trouble spots first when grooming my dogs, and this is one of them that gets special attention for that reason. A “cold in the tail” is quite painful for the dog, very unsightly & pitiful looking, and just needs time to go away. Easily diagnosed, as the tail will look like it “died, or was broken” and it just hangs straight down about 4 inches out from the base of the tail.
The other area I pay special attention to is the area at the back of the skull at the occiput where the hair on the head meets the neck. This often will curl up and forward toward the head in a unsightly way, if it is not totally & completely dried and brushed flat when you first start drying the dog.
When I believe I have the dog well dried, I will then start at the dogs head, with no nozzle on the dryer hose, and essentially “brush the dog with air” in the direction the hair should lay. When I’ve completed that, the dryer is shut off, and I comb & brush the dog for the final time. Any trimming that next touching up would be done at this time. I then have the dog “air dry” more, either with supervision in the house, or with supervision outside for another half hour to avoid their laying down and crimping/pressing hair!
The whole process, will usually take me at least 1.75 hrs. per dog, and longer if I am working for a “show” finish. When I am finished, the dog is DRY, from the skin out. If your dogs are NOT prone to hotspots, if you blow them dry using these instructions, but don’t get them totally dry, just make sure they stay active whether inside the house, or outside so they continue to “air dry” before curling up to snooze. The purpose is to be absolutely sure they are extremely dry, before laying down and pressure “setting” their coat in a undesirable way. This is most important of course, if you are preparing a dog for the show ring ahead of time, i.e. the night before if you are unable to reach the show site in time to do a full groom before ring time. Now days, most successful Golden handlers do a full blow dryjust prior to their ring performance if at all possible.